
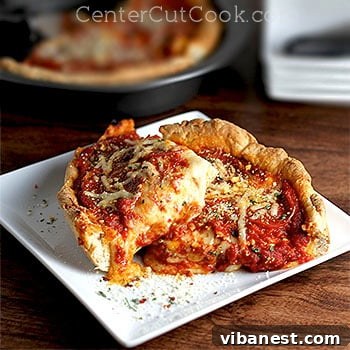
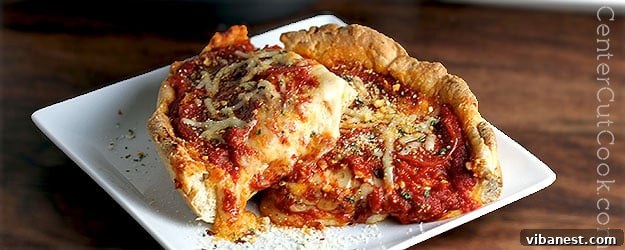
Mastering the Art of Homemade Chicago Deep Dish Pizza: An Authentic Recipe
Growing up in the vibrant suburbs of Chicago, I’ve been incredibly fortunate to indulge in more than my fair share of truly exceptional Chicago-style deep dish pizza. My palate has been trained by the very best – from the legendary Lou Malnati’s with its signature butter crust to Giordano’s renowned for its impossibly thick, cheesy layers. Beyond these titans, countless lesser-known local joints have also served up slices of pure heaven. Despite being surrounded by an abundance of ooey-gooey, cheesy deep dish perfection, I always harbored a personal quest: to discover and master a truly great make-at-home version. What an irony then, that my ultimate discovery would happen at the most inconvenient time imaginable!
A Culinary Quest Born from Adversity
Picture this: It was December last year, and I had just undergone upper and lower jaw surgery. To say it was a challenging experience would be a significant understatement. My mouth was stabilized post-surgery with a series of hooks and rubber bands, making it impossible to open. Basic necessities like brushing my teeth, eating solid foods, and even speaking became monumental struggles. My sole source of nourishment came from a syringe, delivering thinned-out liquids. Smoothies and bottles of Ensure became my new breakfast, lunch, and dinner, a stark contrast to the rich flavors I usually savored.
Under such strict dietary restrictions, one might assume a sensible person would avoid all food-related media. But my passion for food runs deep. I’d sit on my couch, face still swollen, syringe in hand, and drool excessively over every delectable dish I saw on my favorite cooking shows and food blogs. It wasn’t just torture; it was inspiration. This period of enforced culinary abstinence became a treasure hunt. I meticulously saved a multitude of recipes, dreaming of the day I could return to my kitchen and bring them to life. This meticulous cataloging of culinary desires eventually led me to the ultimate prize.
Unveiling the Secrets of Chicago Deep Dish: An America’s Test Kitchen Revelation
The magnificent recipe for homemade Chicago Deep Dish Pizza I’m about to share with you is one of those precious finds I stumbled upon while watching an episode of America’s Test Kitchen, broken jaw and all. America’s Test Kitchen (ATK) is renowned for its scientific approach to cooking, meticulously testing recipes until they achieve perfection. And for Chicago Deep Dish, they absolutely nailed it. A true Chicago-style pizza isn’t just about size; it’s a symphony of distinct components, each playing a crucial role in creating that iconic experience. ATK identified and perfected these key elements:
The Essential Components of Authentic Chicago Deep Dish:
- A Buttery, Flaky Crust: This isn’t your average pizza crust. It’s rich, tender, and provides a delightful crispness that can stand up to the generous fillings.
- An Abundance of Oozy Cheese: We’re talking layers upon layers of low-moisture mozzarella, creating that signature pull and creamy texture.
- A Sweet and Tangy Tomato Sauce: Bright, fresh, and perfectly balanced, this robust sauce is the crowning glory, typically layered on top.
Crucially, these components must be assembled in a specific order: first the crust, then the generous cheese, and finally, the vibrant sauce on top. This unique layering prevents the crust from becoming soggy and protects the cheese from burning. Today, I am thrilled to guide you through the process of recreating this classic Chicago masterpiece in your own home. It requires a bit of time and dedication, but I promise you, the reward is immeasurable. Especially if you live outside the Windy City and yearn for a taste of these beautiful, substantial pies!
Why Embark on Your Own Deep Dish Journey?
While nothing quite beats the atmosphere of enjoying a deep dish in Chicago, making it at home offers a unique set of advantages. You have complete control over the quality of ingredients, ensuring freshness and flavor that matches your preferences. It’s also an incredibly rewarding culinary project, a true labor of love that results in a dish capable of impressing even the most discerning palates. Imagine the aroma filling your kitchen, the anticipation building as it bakes, and finally, the sheer satisfaction of slicing into your very own, perfectly golden, cheesy, and saucy creation. It’s an experience that transcends mere eating; it’s a celebration of good food, shared moments, and culinary achievement.
Step-by-Step Visual Guide to Crafting Your Deep Dish
Before we dive into the detailed recipe card, let’s walk through the key stages of creating this magnificent pizza. Remember, patience is a virtue, especially when it comes to the dough!
- Prepare the Dough with Precision: The journey begins with the dough. Whether you opt for a food processor with a dough blade or a stand mixer with a dough hook, the goal is a smooth, elastic dough that will rise beautifully. This initial step sets the foundation for your buttery, flaky crust.
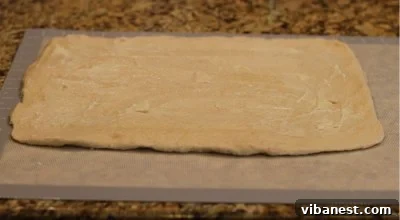
- The Butter Layering Technique: Once your dough has risen and doubled in size, it’s rolled into a precise rectangle. The secret to that iconic flaky texture? A generous layer of softened butter spread evenly across the dough before rolling. This lamination process is what distinguishes an authentic deep dish crust.

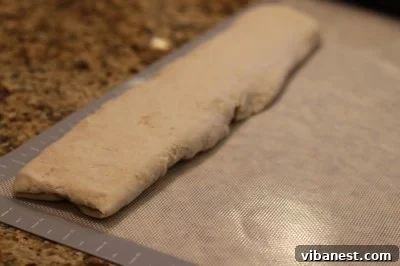
- Forming the Dough Log: Starting from the short end, the buttered dough is carefully rolled into a tight log. This step helps create the distinct layers that will contribute to the crust’s incredible texture after baking.
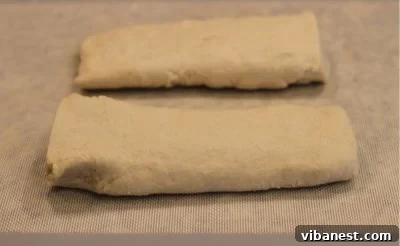
- Divide and Conquer: The elongated dough log is then gently flattened and stretched into a longer rectangle before being cut into two equal pieces. Each piece will form one magnificent deep dish pizza.
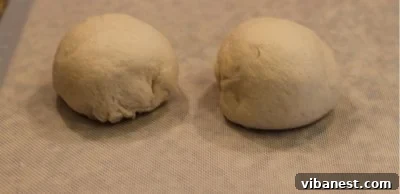
- Folding and Chilling for Flakiness: Each dough piece is folded into thirds, then gently pinched to form a neat ball. These dough balls are then refrigerated for about 50 minutes. This crucial chilling period allows the butter within the dough to firm up, ensuring maximum flakiness during baking.
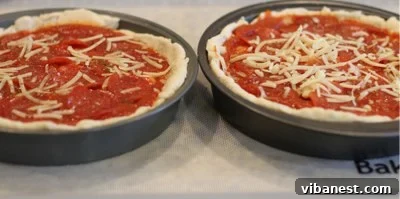
- Assembling Your Masterpiece: Once chilled, each dough ball is rolled into a 13-inch circle. These circles are then carefully pressed into lightly greased 9-inch round cake pans, extending up the sides to form a deep well. Now comes the fun part: layering! Start with a generous amount of fresh mozzarella cheese, followed by your sweet and tangy sauce, and any favorite toppings. A final sprinkle of Parmesan cheese adds the perfect finish.
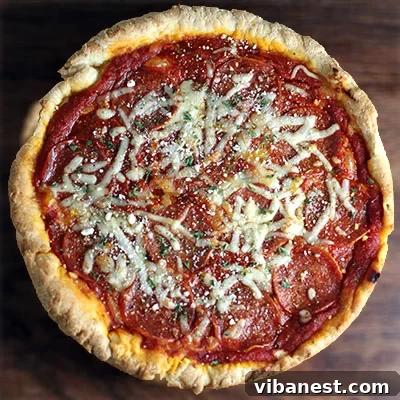
- Bake to Golden Perfection: Finally, your assembled pizzas go into the oven until the crust turns a beautiful golden brown and the cheese is gloriously melted and bubbly. Allow a short cooling period before slicing into your masterpiece and savoring every single bite!
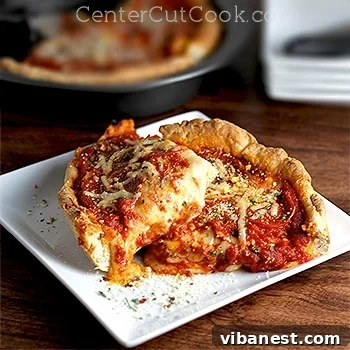
Authentic Chicago Deep Dish Pizza Recipe
DOUGH INGREDIENTS
- 3 1/2 cups (490g) all-purpose flour
- 1/2 cup (70g) yellow cornmeal
- 1 1/2 teaspoons salt
- 2 1/2 teaspoons sugar
- 2 1/4 teaspoons rapid-rise yeast (one standard packet)
- 1 1/4 cups (280ml) warm water (105-115°F / 40-46°C)
- 3 tablespoons unsalted butter, melted
- 4 tablespoons unsalted butter, softened
- 1 teaspoon olive oil (for greasing bowl)
SAUCE INGREDIENTS
- 2 tablespoons unsalted butter
- 1/2 of a small onion, finely diced
- 1/4 teaspoon dried oregano
- 1/2 teaspoon salt
- 2 garlic cloves, minced
- 1 (28 ounce) can fire roasted crushed tomatoes (or regular crushed tomatoes)
- 1/2 teaspoon sugar
- 2 tablespoons chopped fresh parsley (or basil, for extra flavor)
- 1 tablespoon olive oil (for finishing sauce)
OTHER INGREDIENTS
- 4 cups (about 1 lb) fresh grated low-moisture mozzarella cheese
- 1/4 cup fresh grated Parmesan cheese
- Optional: Your favorite pizza toppings (pepperoni, sausage, mushrooms, etc.)
DOUGH DIRECTIONS
- In your food processor with the dough blade attached, or in a stand mixer with the dough hook attached, combine the flour, cornmeal, salt, sugar, and rapid-rise yeast. Pulse or mix briefly to combine.
- With the machine running, slowly add the warm water and the 3 tablespoons of melted butter. Mix for several minutes until the dough comes together and is smooth and elastic. If using a stand mixer, knead for 5-7 minutes. If the dough is not smooth after 4-5 minutes, continue to knead by hand on a lightly floured surface until a smooth consistency is achieved.
- Lightly coat a large bowl with the 1 teaspoon of olive oil. Transfer the dough to the bowl, turning it once to coat. Loosely cover the bowl with plastic wrap or a clean kitchen towel and allow the dough to rise in a warm place for about 1 hour, or until it has doubled in size.
- Lightly flour your work surface or use a non-stick silicone mat. Turn the risen dough out onto it. Using a rolling pin, roll the dough into a 15 by 12-inch rectangle.
- Evenly spread the 4 tablespoons of softened butter over the entire surface of the dough rectangle, leaving a small border at the edges.
- Starting at one of the short ends, tightly roll the dough into a log.
- Using the rolling pin and your hands, gently flatten and stretch the dough log into an 18 by 4-inch rectangle.
- Cut the 18 x 4-inch rectangle of dough into two equal 9-inch pieces.
- Take one piece of dough and fold it into thirds (like folding a letter). Pinch the seams together firmly to form a ball. Repeat with the second piece of dough.
- Place both dough balls in the refrigerator for about 40 minutes. This allows the butter to firm up, which is critical for creating that flaky crust.
- While the dough is chilling, prepare the sauce (directions below) and grate both the mozzarella and Parmesan cheeses.
- After the dough has rested in the fridge for 40 minutes, remove one ball at a time. On a lightly floured surface, roll each piece into a 13-inch circle.
- Pre-heat your oven to 425°F (220°C).
SAUCE DIRECTIONS
- In a large saucepan or Dutch oven, melt the 2 tablespoons of butter over medium heat. Add the finely diced onion and cook, stirring occasionally, until it becomes translucent and softened, about 5-7 minutes.
- Stir in the minced garlic and cook for another minute or two until fragrant, being careful not to burn it.
- Add the salt, dried oregano, sugar, and the fire-roasted crushed tomatoes. Stir well to combine.
- Bring the sauce to a gentle boil, then reduce the heat to low and let it simmer for 20-30 minutes, stirring occasionally. The sauce should thicken and reduce slightly, aiming for about 2 1/2 cups remaining.
- Remove the sauce from the heat. Stir in the fresh chopped parsley (or basil) and the 1 tablespoon of olive oil. Taste and adjust seasoning if necessary.
ASSEMBLY DIRECTIONS
- Lightly grease two 9-inch round cake pans with a bit of olive oil. These pans are crucial for achieving the classic deep dish shape.
- Carefully arrange one 13-inch dough circle in each prepared cake pan. Use your fingers to gently push the dough up along the sides and slightly over the rim, forming a deep crust that will hold all the fillings.
- Distribute 2 cups of the fresh grated mozzarella cheese evenly over the bottom of the dough in each pie.
- Spoon approximately 1 1/4 cups of the prepared tomato sauce over the mozzarella cheese in each pizza.
- If desired, add your favorite toppings (sliced pepperoni, cooked sausage, sautéed mushrooms, etc.) over the sauce.
- Finally, sprinkle 1/4 cup of fresh grated Parmesan cheese over the top of each pizza.
- Place the pizzas on the middle rack of your preheated 425°F (220°C) oven. Bake for 20-30 minutes, or until the crust is golden brown and the cheese is bubbling vigorously and slightly browned. Baking time may vary depending on your oven and toppings.
- Once baked, carefully remove the pizzas from the oven. Allow them to cool for about 5-10 minutes in the pans before attempting to slice. This resting period helps the cheese set and makes for cleaner slices.
- Slice your magnificent homemade Chicago Deep Dish Pizzas and enjoy! This recipe yields two 9-inch pizzas, generously serving 4-6 people.
Tips for Deep Dish Perfection
- Quality Ingredients Matter: Use good quality, low-moisture mozzarella for the best cheese pull and texture. Freshly grated is always superior to pre-shredded.
- Don’t Skimp on Butter: The butter in the crust is essential for that signature flaky texture. Follow the measurements closely.
- Pan Choice: While 9-inch round cake pans work perfectly, some enthusiasts also use cast iron skillets for an even crispier bottom crust.
- Patience with the Dough: Don’t rush the rising or chilling times. These steps are crucial for the dough’s texture and flavor development.
- Resting is Key: Allowing the pizza to rest for 5-10 minutes after baking helps the cheese set and makes for easier, cleaner slicing without all the fillings sliding out.
- Customize Your Toppings: While classic Chicago deep dish often features sausage or pepperoni, feel free to add your favorite vegetables or meats. Just remember to cook any raw meats beforehand.
- Storage: Leftover deep dish can be stored in the refrigerator for up to 3 days and reheated in a conventional oven or toaster oven for best results.
There you have it – the comprehensive guide to creating an authentic Chicago Deep Dish Pizza right in your own kitchen. It’s a culinary adventure that promises rich rewards: a truly unforgettable pizza experience that will transport your taste buds straight to the Windy City. Don’t be intimidated by the steps; each one contributes to a masterpiece. Gather your ingredients, prepare for a fantastic baking session, and get ready to impress everyone with your homemade deep dish creation!
Recipe adapted from America’s Test Kitchen, Season 11