
Transform your next gathering into a memorable culinary experience with Campfire Cones – the ultimate, customizable s’mores delight that can be enjoyed straight from the grill, oven, or classic campfire!
If you’re looking to elevate your dessert game beyond the traditional s’mores, then you, my friend, are about to discover your new favorite treat: Campfire Cones. Don’t let the name fool you into thinking you need an actual roaring campfire to create these delectable desserts. While they are a perfect companion for a starry night by the fire, these gooey, chocolatey, marshmallow-filled cones are incredibly versatile. They can be just as easily prepared on your backyard grill, or even baked to perfection in your kitchen oven. In just about 10 minutes, you can have a warm, bubbling, and utterly irresistible treat ready to be devoured!

Beyond their simplicity, Campfire Cones offer a fantastic opportunity for culinary creativity, allowing everyone to customize their own personal dessert. Imagine a crispy waffle cone, brimming with your favorite sweet fillings, all melted into a warm, gooey perfection. It’s an experience that truly captures the spirit of s’mores but with a fun, less messy, and more adaptable twist.
Love this idea? Save it for later!
Pin It Now
What Makes Campfire Cones a Must-Try Dessert?
If you’re still on the fence about trying Campfire Cones, let us convince you. This dessert takes the beloved elements of s’mores – melted chocolate and toasted marshmallows – and encases them in a convenient, edible vessel. No more sticky fingers from assembling multiple layers, and no more chasing rogue marshmallows! Here’s why these cones are quickly becoming a family favorite:
- Unmatched Versatility: As mentioned, you’re not confined to a campfire. This makes Campfire Cones perfect for any season or occasion, whether it’s a summer BBQ, a cozy winter night indoors, or a traditional camping trip.
- Effortless Customization: The beauty of Campfire Cones lies in the ability for each person to create their own unique flavor profile. From various chocolates and candies to fruits and spreads, the possibilities are virtually endless.
- Less Mess, More Fun: Traditional s’mores can be wonderfully messy. Campfire Cones, while still delightfully gooey, contain all that goodness within the cone, making for a cleaner eating experience, especially for kids.
- Quick & Easy Preparation: With minimal prep and a short cooking time, these cones are ideal for spontaneous dessert cravings or when you need a crowd-pleaser in a pinch.
- Kid-Friendly Activity: Assembling the cones can be a fun activity for children, allowing them to personalize their dessert and feel involved in the cooking process.
The method for making these Campfire Cones is incredibly simple, making them accessible for even the most novice of cooks. You’ll start with your choice of ice cream cone, a selection of delicious fillings, and a piece of foil. That’s it! The magic happens when heat transforms the ingredients into a warm, gooey delight.
Mastering the Ingredients: Your Campfire Cone Toolkit
While the concept is simple, selecting the right ingredients can make all the difference in achieving that perfect, molten interior and sturdy exterior. Here’s a deeper dive into what you’ll need:
Choosing Your Cone Base
- Waffle Cones: My personal preference, and highly recommended, are waffle cones. Their sturdy construction provides excellent support for all the fillings, preventing leaks as the ingredients melt. Plus, their larger opening allows for more “goodness” to be packed inside!
- Sugar Cones: These are a good alternative if you prefer a slightly thinner, sweeter cone. They hold up reasonably well to the heat.
- Cake Cones: While these are lighter and crispier, they might not be as durable for holding large amounts of melted ingredients. Use them if that’s what you have, but be extra careful with wrapping and handling.
The S’mores Essentials
The core of any s’mores-like treat relies on these two classic components:
- Mini Marshmallows: These are ideal because they melt quickly and evenly, creating a fluffy, sweet filling. You can use larger marshmallows, but you might need to cut them into smaller pieces for better distribution.
- Chocolate Chips: Semi-sweet or milk chocolate chips are classic choices. They melt into a luscious, rich sauce that binds all the other ingredients together. Chocolate chunks or finely chopped chocolate bars also work wonderfully for a more luxurious texture.
The Optional, But Highly Recommended, Secret Weapon: Peanut Butter
I am absolutely obsessed with the combination of peanut butter and s’mores, and lining the cone with a layer of peanut butter before adding other fillings is a game-changer. It adds a salty, nutty depth that perfectly balances the sweetness of the marshmallows and chocolate. You can spread it thinly around the inside of the cone, creating a barrier and an extra layer of flavor. If peanut butter isn’t your thing, consider almond butter, hazelnut spread (like Nutella), or even a caramel sauce for a different flavor profile.
How to Make Campfire Cones: A Simple 3-Step Process
These s’mores treats are remarkably easy to customize and enjoy in just a few minutes. Here’s a concise guide, with more detailed cooking times available in the full recipe card below:
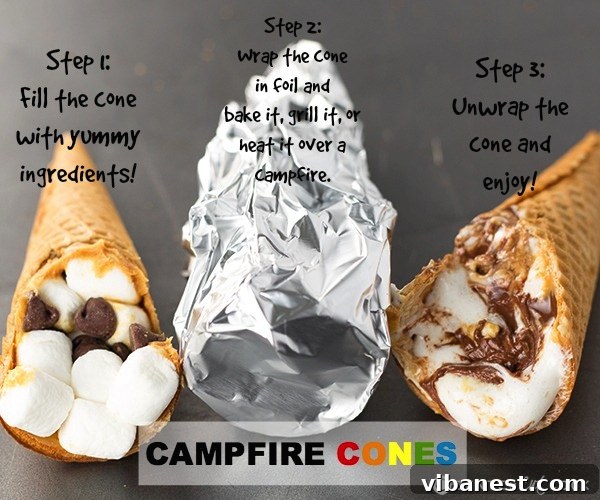
- Choose Your Toppings and Assemble: Begin with your chosen ice cream cone. For an extra layer of flavor and to help prevent leaks, I highly recommend lining the inside of the cone with a thin layer of peanut butter. Next, fill the cone generously with your favorite s’mores toppings. A classic combination includes mini marshmallows and chocolate chips, but feel free to get creative! Fill it to the brim, ensuring a good mix of ingredients.
- Prepare for Heating: Once your cone is filled, carefully wrap the entire cone tightly with aluminum foil. This step is crucial, as it prevents the toppings from spilling out as they melt and ensures even heating. Make sure there are no gaps where the gooey ingredients could escape.
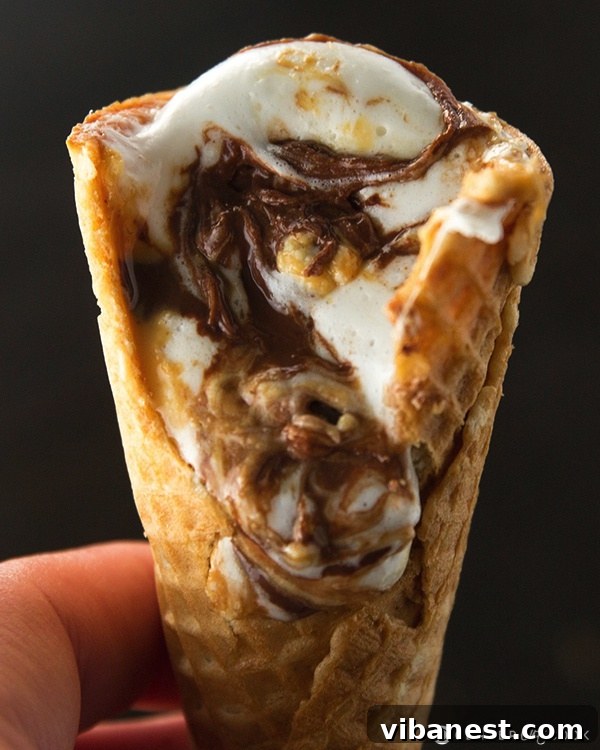
- Cook and Enjoy!: Place your foil-wrapped cones on your chosen heat source. Whether you’re using an oven, a grill, or an open campfire, the goal is to melt the ingredients until they’re warm, soft, and gooey. Once cooked, carefully unwrap the hot cones – watch out for steam! Allow them to cool for a minute or two before digging in, as the melted contents will be very hot. The result is a heavenly blend of melted peanut butter, chocolate, and marshmallows that will have everyone reaching for more!
Endless Variations: Unleash Your Campfire Cone Creativity!
The beauty of Campfire Cones lies in their incredible adaptability. You can change these cones up however you’d like, making them a special dessert treat that both adults and kids will adore. Think beyond the classic s’mores combination and let your imagination run wild:
Fruity Twists
Adding fruit provides a refreshing counterpoint to the sweetness and can introduce new textures. Just be mindful that certain fruits, especially those with high water content, might make the cones soggy if prepared too far in advance.
- Sliced Bananas: A natural pairing with peanut butter and chocolate, bananas become wonderfully soft and caramelized when heated.
- Sliced Strawberries: Offer a bright, slightly tart flavor that cuts through the richness.
- Raspberries or Blueberries: Small berries can be tucked in for bursts of fruity flavor.
- Apple Pieces: Diced apples, especially when tossed with a pinch of cinnamon, can create an apple pie-like experience.
Candy & Topping Galore
Transform your cones into a candy-filled wonderland with these indulgent additions:
- Alternative Chips: Swap classic chocolate chips for peanut butter chips, butterscotch chips, white chocolate chips, or caramel chips for different flavor profiles.
- Chopped Candy Bars: M&M’s, Rolo’s (caramel melts beautifully!), chopped Heath Toffee Bar pieces, Snickers, or Reese’s Peanut Butter Cups can all be fantastic additions.
- Sprinkles: Add some colorful sprinkles after cooking for a festive touch, especially if serving to kids.
- Nuts: Chopped pecans, walnuts, or almonds can add a delightful crunch and nutty flavor.
- Coconut Flakes: Toasted coconut flakes can bring a tropical flair.
Gourmet Additions & Spreads
For those looking to elevate their Campfire Cones to a more sophisticated level:
- Cream Cheese: A dollop of cream cheese can add a tangy richness, reminiscent of cheesecake.
- Different Spreads: Beyond peanut butter, try Nutella for a chocolate-hazelnut dream, or Biscoff spread for a spiced cookie flavor.
- Spices: A pinch of cinnamon, nutmeg, or even a tiny dash of cayenne pepper (for a Mexican hot chocolate feel) can add unexpected depth.
- Pretzels: Crushed pretzels can add a salty crunch, perfectly complementing the sweet fillings.

Make-Ahead Tip for Effortless Entertaining!
These Campfire Cones are a fantastic treat or snack to prepare ahead of time, making them perfect for parties, camping trips, or busy weeknights. Simply fill your cones with your desired toppings and wrap them tightly with foil. They can be assembled up to two days in advance and stored in a cool, dry place until you’re ready to cook them. When it’s time to enjoy, simply add them directly to your cooking source – whether that’s the oven, grill, or campfire. However, a word of caution: if you are adding fresh fruit to your cones, I do not recommend making them ahead of time, as the fruit can release moisture and make the cones soggy. For fruit-filled cones, assemble and cook them fresh!
Recipe: Classic Campfire Cones

Campfire Cones
Campfire Cones are a fun and easy twist on classic s’mores, filled with your favorite gooey ingredients and perfect for cooking over a campfire, on the grill, or in the oven!
Prep Time: 5 minutes
Cook Time: 6-10 minutes (varies by method)
Pin Recipe
Equipment
- Aluminum foil
Ingredients
- Ice cream cones (waffle cones recommended for sturdiness)
- Favorite s’mores toppings (peanut butter, mini marshmallows, chocolate chips, sliced strawberries, sliced bananas, other candies, etc.)
Instructions
- Prepare Cones: If desired, line the inside of each ice cream cone with a thin layer of peanut butter. Then, fill the cones generously with your favorite s’mores toppings. A popular combination includes mini marshmallows and chocolate chips. Ensure the cone is full but not overflowing.
- Wrap Tightly: Carefully wrap each filled cone tightly with aluminum foil. Make sure the foil completely encloses the cone and its contents to prevent any melted ingredients from leaking out during cooking.
- Cook Using Your Preferred Method:
- Oven Directions: Preheat oven to 350°F (175°C). Place the foil-wrapped cones on a baking sheet and bake for 5-7 minutes, or until the marshmallows and chocolate are melted and gooey.
- Grill Directions: Preheat your grill to medium heat. Place the foil-wrapped cones directly on the grill grates. Cook for 5-10 minutes, turning occasionally (every 2-3 minutes), until the fillings are melted.
- Campfire Directions: Place the foil-wrapped cones directly on hot coals or use tongs to hold them over the flames. Heat for about 3-5 minutes, rotating frequently, until the chocolate and marshmallows have thoroughly melted.
- Unwrap and Serve: Carefully remove the hot cones from the heat source. Allow them to cool for a minute or two before carefully unwrapping the foil. The contents will be very hot! Enjoy your warm, gooey Campfire Cones immediately.
Other Easy Dessert Recipes You’ll Love
If you enjoyed the simplicity and deliciousness of these Campfire Cones, you’ll be thrilled to discover more simple and delightful dessert recipes that are perfect for any occasion. Here are some of my top recommendations:
- S’mores Nachos: A sheet pan twist on the classic, perfect for sharing!
- Cheesecake Stuffed Strawberries: An elegant, no-bake treat that’s surprisingly easy.
- Edible Chocolate Chip Cookie Dough: Indulge your sweet tooth safely with this egg-less delight.
We love hearing from you! If you make these incredible Campfire Cones or any of my other recipes, please let me know how you enjoyed them by leaving a comment. Your feedback is always appreciated and helps inspire more delicious creations!