
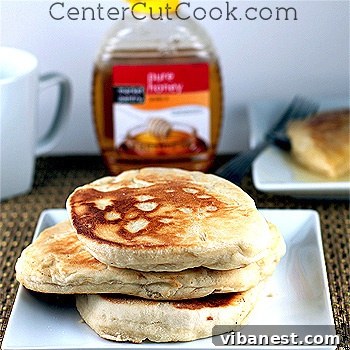
Discover the Magic of Pan-Fried Scones: A Family Legacy
When you hear the word “scone,” what image first springs to mind? For many, it’s the familiar sight behind a coffee shop counter – a often triangular, baked pastry, sometimes studded with berries, apples, or infused with pumpkin spice. These delightful confections typically boast a cake-like or crumbly texture, often enjoyed with coffee or tea, signifying a delightful treat.
However, prepare to have your understanding of “scones” delightfully broadened. This article isn’t about those familiar baked goods, but rather a unique, deeply cherished family recipe for what we affectionately call “pan-fried scones.” These aren’t just different; they are an entirely distinct culinary experience. This cherished recipe has traveled through generations, passed down from my beloved Granny, to my Mom, and now to me. And with every intention of sharing this joy, I plan to pass it on to my children, ensuring that the heartwarming tradition of Granny’s pan-fried scones continues to enrich our lives.
The Untold Story of Utah Scones: A Culinary Departure
A little research into the origins of the scones I grew up with reveals a fascinating regional history: they appear to have originated in Utah. This revelation brings a comforting sense of understanding, given that my grandmother, the originator of this very recipe, spent her formative years there. This regional nuance explains why many outside of certain parts of the American West might find these scones to be a novel concept, a delightful secret waiting to be discovered.
So, what exactly sets these pan-fried scones apart? The answer lies in their fundamental preparation and ingredients. Unlike their oven-baked counterparts, these scones are pan-fried to golden perfection, transforming a simple dough into something extraordinary. The most significant difference, however, is their foundation: they are made from a rich, tender yeast dough. This stands in stark contrast to most traditional scones, which typically rely on baking powder or soda for their rise, resulting in that characteristic dense or crumbly texture. The yeast lends an incredible softness, a slight chewiness, and a depth of flavor that is truly unparalleled.
A Symphony of Flavor: The Ultimate Comfort Food
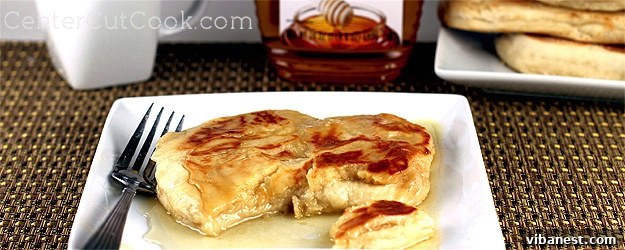
The culinary journey with these pan-fried scones doesn’t end with their unique preparation; it truly begins when they emerge from the skillet. Piping hot and exquisitely golden, they are simply incomplete without a generous slather of creamy butter, melting luxuriously into every crevice, followed by a lavish drizzle of golden honey. The combination is nothing short of heavenly – the slight saltiness of the butter, the sweet warmth of the honey, and the pillowy softness of the scone create a symphony of flavors and textures that is utterly addictive.
Are they a health food? Let’s be honest, probably not in the strictest sense. But are they undeniably delicious and incredibly soul-satisfying? Absolutely! This is precisely why they hold a special place in my culinary repertoire, making an appearance every now and then, but especially for those cherished special holiday breakfasts. They are a dish that transcends mere sustenance, becoming a centerpiece of celebration and comfort. Even my husband, who had never encountered this unique style of scone before we met, was instantly won over, proudly declaring them one of his all-time favorite breakfast treats. That’s a testament to their irresistible charm!
The Foundation: Mastering the Yeast Dough
As previously highlighted, the secret to these incredible pan-fried scones lies in their foundation: a well-crafted yeast dough. The specific recipe I use for this dough comes directly from my Mom, and while its precise origin remains a mystery – perhaps a handed-down gem from another family friend or cookbook – its effectiveness is beyond question. This dough isn’t just fabulous for making these distinctive scones; it also produces some truly exceptional, soft, and fluffy dinner rolls. This versatility is a major bonus, allowing you to use a single dough recipe for multiple delightful creations.
While you certainly have the freedom to choose any preferred yeast dinner roll dough recipe, I confess a strong bias towards this particular one. Its consistent results and tender texture make it the perfect partner for our pan-fried scone adventure. Working with yeast dough might seem intimidating to some, but it’s a rewarding process. The gentle magic of yeast transforming simple ingredients into a living, breathing dough is truly satisfying. Patience is key when allowing the yeast to activate and the dough to rise, but the payoff is a light, airy texture that is simply unmatched by quick bread alternatives. Remember, a good yeast dough is the heart of these scones, providing that characteristic softness and depth that makes them so uniquely delicious.
An Invitation to Culinary Bliss: Don’t Miss Out!
If the concept of a pan-fried scone is new to you, let me assure you, you are in for an extraordinary treat! Seriously, I wholeheartedly recommend you pause whatever you’re doing, gather your ingredients, and embark on the journey of making this dough. There’s a certain magic that unfolds in the kitchen as you prepare these, anticipating the warm, buttery, honey-drizzled goodness. Trust me, once you’ve experienced the tender, golden perfection of a homemade pan-fried scone, topped generously with butter and honey, you’ll feel as though a vital piece of your culinary life has finally clicked into place. Life, my friends, will almost be complete. Embrace this delicious adventure and add a new, cherished recipe to your family’s traditions!
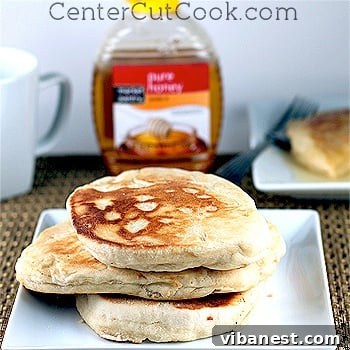
INGREDIENTS FOR PAN-FRIED SCONES
- 2 packages active dry yeast (approximately 4 1/2 teaspoons)
- 1/2 cup warm water (around 105-115°F / 40-46°C)
- 1 tablespoon granulated sugar (for activating yeast)
- 1 cup milk, scalded and cooled
- 1/3 cup shortening, melted and cooled (or unsalted butter)
- 1/3 cup granulated sugar
- 2 teaspoons salt
- 2 large eggs, lightly beaten
- 5 cups all-purpose flour, plus extra for dusting
- Butter for frying (about 1 tablespoon per scone batch)
- Softened butter and honey for serving
DIRECTIONS FOR MAKING PAN-FRIED SCONES
- Activate the Yeast: In a small bowl, combine the warm water and 1 tablespoon of sugar. Sprinkle the two packages of active dry yeast over the water. Stir gently, then set it aside for 10-15 minutes. During this time, the mixture should become foamy and bubbly, indicating the yeast is active and ready to work its magic.
- Prepare the Milk Mixture: Scald the milk by heating it in a saucepan over medium heat until small bubbles form around the edges and steam rises, but do not let it boil. Remove from heat and allow it to cool down to lukewarm. Once cooled, stir in the melted and cooled shortening (or butter), the 1/3 cup of sugar, and the salt.
- Combine Wet and Dry Ingredients: In a large mixing bowl, add the beaten eggs and the activated yeast mixture to the cooled milk mixture. Gradually incorporate the 5 cups of flour, adding it one cup at a time. Mix thoroughly after each addition until all the flour is incorporated. The dough will be quite sticky at this stage, which is perfectly normal and desired for a tender scone.
- Divide and Shape the Dough: Lightly sprinkle a clean countertop or a large plate with flour to prevent sticking. Carefully transfer the sticky dough onto the floured surface. Divide the dough into 8 to 10 equal sections, depending on your desired scone size. For larger scones, aim for 8; for slightly smaller ones, 10 sections work well.
- Form the Scones: Take one section of dough at a time. Gently flatten and shape it into a circular disc, approximately 1/2 inch thick. Avoid overworking the dough to maintain its tenderness. Repeat with the remaining dough sections.
- Prepare for Frying: Heat a large, heavy-bottomed skillet (cast iron works wonderfully) over medium-low heat. Add about a tablespoon of butter to the pan and allow it to melt completely, coating the bottom of the skillet. The key here is proper temperature control – too high, and the scones will burn outside and be raw inside; too low, and they will become greasy. You know your stove best, so adjust the heat as needed to achieve a gentle sizzle.
- Fry the Scones: Carefully place a scone into the heated skillet. Cook for several minutes on one side until it achieves a beautiful, golden-brown color. Once golden, carefully flip the scone to cook the other side until it, too, is golden brown and cooked through. Repeat with the remaining scones, adding more butter to the pan as needed for each batch.
- The Secret to Perfection: It’s crucial to ensure your pan is not overly hot. Cooking the scones on a moderate to low temperature allows the yeast dough to cook evenly all the way through, resulting in a perfectly soft, airy interior and a crisp, golden exterior. If the heat is too high, you’ll end up with beautifully browned scones that are unfortunately still doughy in the middle. Patience with the cooking temperature yields the best results.
- Serve with Love: As soon as the scones are ready, transfer them to a plate. While still warm, generously slather each one with softened butter, allowing it to melt beautifully into the porous surface. Follow with a decadent drizzle of honey. While honey is undoubtedly the traditional and most beloved topping, feel free to experiment with various jellies or fruit jams for a different flavor profile. However, in our family, the butter and honey combination reigns supreme as the ultimate way to enjoy these delightful pan-fried scones!