
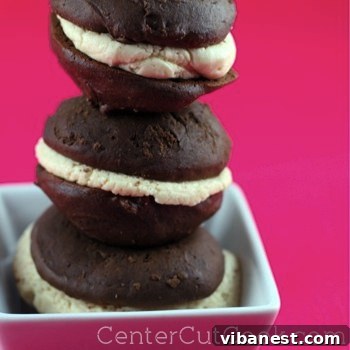

Indulge in Homemade Chocolate Peanut Butter Whoopie Pies: The Ultimate Decadent Treat
There are some flavor combinations so timeless, so universally beloved, that they transcend mere food and become an experience. For many, that iconic pairing is chocolate and peanut butter. In our home, this dynamic duo isn’t just a favorite; it’s a way of life, especially for my husband. Mentioning that I’m whipping up a treat that unites the rich depth of chocolate with the creamy, nutty embrace of peanut butter, whether it’s classic Chocolate Peanut Butter Cupcakes or a simple tray of no-bake bars, guarantees a smile and eager anticipation. It’s a culinary guarantee of happiness, a combination that truly brings joy with every single bite.
The allure of chocolate and peanut butter lies in their contrasting yet complementary profiles. The slight bitterness and intense flavor of dark cocoa perfectly cut through the sweet, savory richness of peanut butter, creating a harmonious balance that is nothing short of addictive. This isn’t just about satisfying a sweet tooth; it’s about indulging in a comfort food that evokes fond memories and delivers pure, unadulterated bliss. It’s the reason why countless desserts feature this duo, and why we keep coming back to it time and time again. When these two ingredients meet, magic happens, and our taste buds sing with delight.
Recently, the stars aligned for a particularly special treat. My husband, ever the thoughtful partner, surprised me with an early Valentine’s Day present that perfectly captured his unique charm. Being a true geek at heart, someone who practically lives in front of a computer screen, his creativity often manifests in digital wonders. This year, it took the form of the most adorable and truly creative valentine – a massive, personalized poster that filled our space with laughter and love. The gesture was so heartwarming, so ‘him,’ that I immediately knew a culinary thank you was in order. And what better way to express gratitude for such a sweet and original gift than with a dessert crafted from his absolute favorite flavors?
My solution, a stroke of inspiration born from a deep understanding of his preferences, was nothing less than glorious: Homemade Chocolate Peanut Butter Whoopie Pies. Imagine two tender, moist, and deeply chocolatey cake-like cookies, perfectly portioned and baked to a delightful softness. Now, picture them embracing a generous dollop of homemade, incredibly creamy, and fluffy peanut butter frosting. The result is a dessert that’s more than just a sweet treat; it’s a symphony of textures and flavors, a perfect handheld delight that marries the beloved combination in a truly unforgettable way. These aren’t just cookies; they’re little rounds of happiness, each bite a testament to the power of a perfect pairing that will leave everyone craving another.

Why Chocolate Peanut Butter Whoopie Pies Are the Perfect Treat to Share
While Valentine’s Day often conjures images of vibrant pinks, passionate reds, and whimsical hearts, true affection can be conveyed in countless ways. Sometimes, the most meaningful gesture is simply sharing something delicious that you know will bring joy. These Chocolate Peanut Butter Whoopie Pies are the epitome of such a gesture. Despite their lack of traditional Valentine’s aesthetics, their irresistible flavor profile and comforting homemade goodness speak volumes. They’re a testament to love, care, and the simple pleasure of a perfectly balanced dessert. If you’re searching for a unique and genuinely satisfying treat to share with your loved ones, these whoopie pies will undeniably do the trick, creating sweet memories one delicious bite at a time, proving that love truly is in the details – and the desserts!
Whoopie pies, for the uninitiated, are often described as a delightful hybrid between a cookie and a cake. They offer the portability of a cookie with the soft, tender crumb of a mini cake. The beauty of this particular recipe lies in its simplicity and the profound satisfaction it delivers. The rich chocolate cookies are fudgy and moist, boasting a deep cocoa flavor that melts in your mouth. This decadent base provides a perfect contrast to the light, airy, and intensely flavorful peanut butter frosting, creating a harmonious balance that is truly a dream come true for any dessert lover. It’s a dessert that feels indulgent yet approachable, sophisticated yet utterly comforting. Making them from scratch allows you to control the quality of ingredients and infuse them with that special homemade touch that store-bought treats simply can’t replicate.
A Quick Note on Frosting Quantities: I often find myself with a generous amount of leftover frosting when making this recipe. This is rarely a problem in our house (extra frosting is always a welcome bonus, especially when it’s peanut butter!), but if you prefer to have just enough for your whoopie pies, you have two excellent options. You can either halve the frosting recipe, ensuring less waste and a more precise yield. Alternatively, if you’re like us and believe more whoopie pies mean more happiness, simply double the cookie recipe! This will allow you to make a larger batch, ensuring none of that delectable peanut butter frosting goes to waste. It’s a win-win situation, guaranteeing either the perfect amount or an abundance of deliciousness ready to be enjoyed or shared with friends and family.
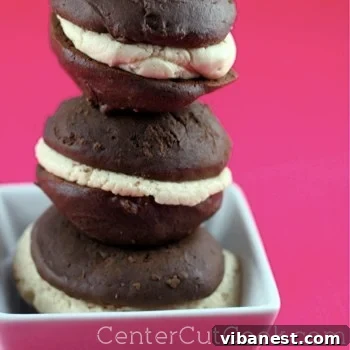
Chocolate Peanut Butter Whoopie Pies Recipe
Ingredients for the Velvety Chocolate Cookies
- 1/2 cup (1 stick) unsalted butter, softened to room temperature for smooth creaming.
- 3/4 cup packed light brown sugar, for moisture and a subtle caramel note.
- 1/4 cup granulated sugar, to add sweetness and aid in texture.
- 1 teaspoon baking powder, for lift and a tender crumb.
- 1/2 teaspoon baking soda, to react with the cocoa for extra rise and color.
- 3/4 teaspoon fine sea salt, to balance the sweetness and enhance flavors.
- 1 teaspoon pure vanilla extract, for a warm, aromatic base.
- 1 large egg, at room temperature, for binding and richness.
- 1/2 cup unsweetened cocoa powder, (Dutch-processed recommended for a darker, smoother chocolate flavor without bitterness).
- 2 1/3 cups all-purpose flour, carefully measured for the right consistency.
- 1 cup whole milk, at room temperature, to ensure a smooth batter.
Ingredients for the Dreamy Peanut Butter Frosting
- 10 oz (about 1 1/4 blocks) cream cheese, softened to room temperature for a lump-free, creamy frosting.
- 1/2 cup (1 stick) unsalted butter, softened to room temperature, providing richness and structure.
- 5 cups confectioners’ sugar (powdered sugar), sifted to avoid any lumps and ensure a silky smooth texture.
- 2/3 cup creamy peanut butter, (such as Jif or Skippy; avoid natural peanut butter as it can separate and affect frosting consistency).
Step-by-Step Directions for Crafting Your Whoopie Pies
- Prepare Your Workspace: Begin by preheating your oven to a precise 350°F (175°C). This ensures even baking from the start. Line two large baking sheets with parchment paper or silicone baking mats. If you don’t have these, lightly grease the surfaces. This crucial step prevents sticking and ensures easy removal of your delicate cookies after baking.
- Cream the Wet Ingredients: In the bowl of a stand mixer fitted with the paddle attachment (or using a large bowl and a sturdy hand mixer), combine the softened butter, packed brown sugar, granulated sugar, baking powder, baking soda, salt, and vanilla extract. Beat on medium speed for about 2-3 minutes, until the mixture is light, fluffy, and thoroughly combined. Remember to scrape down the sides of the bowl as needed to ensure everything is incorporated evenly and no dry spots remain.
- Incorporate the Egg: Add the large egg to the creamed mixture. Continue to beat on medium speed for another minute, or until the consistency is completely smooth and the egg is fully integrated into the batter. This step adds essential richness and helps to bind the dough, contributing to the cookies’ tender texture.
- Add the Cocoa Powder: Carefully mix in the unsweetened cocoa powder. Start on low speed to prevent a “cocoa cloud” from forming, then gradually increase to medium speed until the cocoa is fully combined with the wet ingredients. The mixture will now look wonderfully thick and deeply chocolatey.
- Alternate Wet and Dry: With the mixer on its lowest speed, add half of the room temperature milk, mixing just until it’s almost combined. Immediately after, slowly add half of the all-purpose flour, mixing until it’s just incorporated. Repeat this process with the remaining milk and flour, being careful not to overmix the dough. Overmixing can develop the gluten too much, potentially leading to tougher cookies. The goal is a smooth, somewhat thick batter that holds its shape.
- Portioning the Cookies: Now for the fun part! If you’re aiming for large, classic whoopie pies, drop rounded 1/4 cup portions of dough onto your prepared baking sheets, leaving about 2 inches between each cookie to allow for proper spreading during baking. For charming mini whoopie pies (which are often easier to eat and perfect for parties), use 1 rounded tablespoon of dough per cookie. Remember, you’ll need an even number of cookies to make perfect pairs!
- Baking the Cookies: Carefully transfer the baking sheets to your preheated oven. For large whoopie pies, bake for approximately 15 to 16 minutes. For mini whoopie pies, bake for a shorter duration, typically 11-12 minutes. The cookies are done when they are set and spring back slightly when gently touched in the center. It’s crucial not to overbake, as this will result in dry cookies. Allow them to cool on the baking sheets for 5 minutes before carefully transferring them to a wire rack to cool completely. This prevents them from becoming soggy and ensures they hold their shape.
- Prepare the Dreamy Frosting: While your chocolate cookies are cooling to room temperature, it’s time to create the luscious peanut butter frosting. In a clean mixer bowl, combine the softened cream cheese and softened butter. Beat on medium speed until the mixture is incredibly smooth and creamy, without any lumps – this might take 2-3 minutes.
- Build the Frosting Base: Gradually add the sifted confectioners’ sugar, one cup at a time. Start mixing on low speed to prevent a sugar cloud, then increase to medium. Be sure to scrape down the sides of the bowl frequently to ensure all the sugar is thoroughly incorporated. The mixture will become quite thick and stable.
- Add the Peanut Butter: Finally, add the 2/3 cup of creamy peanut butter to the frosting base. Continue mixing on medium-high speed for another 2-3 minutes, until the frosting is wonderfully light, fluffy, and airy. This aeration is key to achieving that smooth, pipeable, and delightfully spreadable frosting texture.
- Assemble Your Whoopie Pies: Once the chocolate cookies are completely cooled (this is absolutely crucial to prevent the frosting from melting!), take one cookie and dollop a generous amount of frosting onto its flat side. How much is up to you – we love extra frosting and typically use a good tablespoon or more for each mini whoopie pie, creating a delightful thick layer! Gently top with another cooled cookie, flat side down, pressing just enough to sandwich the frosting and create your perfect whoopie pie. Repeat this process with all remaining cookies and frosting until every whoopie pie is assembled and ready to be devoured.
Pro Tips for Perfect Whoopie Pies: Elevate Your Baking
- Room Temperature Ingredients are Key: Always ensure your butter, cream cheese, egg, and milk are at room temperature. This allows them to cream together smoothly and evenly, resulting in a uniform batter and frosting texture that is essential for whoopie pie perfection.
- Don’t Overmix: For both the cookie dough and the frosting, mix just until the ingredients are combined. Overmixing can develop the gluten in the flour too much, leading to tough cookies, and can also deflate the frosting, making it less airy and fluffy.
- Cool Completely: Patience is a true virtue here! Assembling whoopie pies with warm or even slightly warm cookies will inevitably result in melted, messy frosting. Ensure your cookies are entirely cool before adding the filling to maintain that perfect structure and creamy texture.
- Consistency is Crucial: Pay attention to your dough and frosting. If your cookie dough seems too sticky to handle, chill it briefly in the refrigerator for 15-20 minutes. If your frosting seems too thick, add a tiny splash of milk (about 1/2 teaspoon at a time) until it reaches the desired consistency. If it’s too thin, gradually add a bit more sifted confectioners’ sugar.
- Storage: To keep your homemade whoopie pies fresh and delicious, store assembled whoopie pies in an airtight container at room temperature for up to 2 days. For longer enjoyment, they can be stored in the refrigerator for up to 5 days. For extended freshness, whoopie pies freeze beautifully for up to 2-3 months; just thaw them at room temperature before serving.
- Flavor Variations: Don’t hesitate to experiment! You can try different extracts in the cookies (e.g., a hint of almond for a nutty depth or peppermint for a festive holiday twist). For an extra layer of decadence, consider dipping half of the assembled whoopie pie in melted chocolate and letting it set before serving.
These homemade Chocolate Peanut Butter Whoopie Pies are more than just a dessert; they’re an experience. They embody the perfect blend of rich, comforting chocolate and savory, creamy peanut butter, all wrapped up in a delightful, handheld package. Whether you’re celebrating a special occasion, looking for a unique gift to show appreciation, or simply want to treat yourself and your loved ones to an extraordinary indulgence on a regular Tuesday, this recipe delivers every single time. So go ahead, preheat your oven, gather your ingredients, and prepare to create some truly unforgettable sweet magic in your kitchen. Your taste buds (and your loved ones) will undoubtedly thank you for this delightful journey of flavor!
This delectable recipe was lovingly adapted and enhanced from the baking experts at
King Arthur Flour, a trusted source for quality baking inspiration and timeless recipes.