
Creating Unforgettable Memories: Your Guide to a Joyful Gender Reveal Party & DIY Cupcakes
Gender reveal parties have become a cherished tradition for expectant parents worldwide, offering a vibrant and exciting way to share the joyous news of their baby’s gender with loved ones. While I might not have initially considered hosting one, life often throws unexpected curves. For us, the discovery of Ryan’s cancer diagnosis just a week after learning we were expecting sparked a profound desire for something fun, hopeful, and forward-looking to plan. In the face of adversity, celebrating new life and creating precious memories felt more important than ever. So, with hearts full of anticipation, we decided to host our very own gender reveal party!
Today, I’m thrilled to take you behind the scenes of our special day, sharing not only how we planned a memorable celebration but also the essential element that stole the show: our homemade Gender Reveal Cupcakes. These delightful treats were the perfect vehicle for unveiling our big news, and I can’t wait to guide you through making your own. Let’s dive into the details, from charming decor to scrumptious treats!
Why Host a Gender Reveal Party?
Beyond our personal journey, gender reveal parties offer a unique opportunity to build excitement and anticipation during pregnancy. They allow families and friends to collectively celebrate a significant milestone, creating a sense of community and shared joy. It’s a fantastic excuse to gather loved ones, enjoy delicious food, and participate in a heartwarming event that culminates in a truly unforgettable moment. Whether it’s a first baby or an addition to the family, a gender reveal can be a wonderful way to mark the upcoming arrival and start the bonding process even before the baby is born. These celebrations create lasting memories and offer a chance for everyone to guess and get involved in the suspense.
Designing Your Dream Gender Reveal: Decor & Theme Ideas
The atmosphere of any party truly comes alive with thoughtful decorations, and a gender reveal is no exception. Setting the right tone with a beautiful and cohesive theme makes the celebration even more magical. For our party, I leaned heavily on the incredible resources available at Minted.com. They are an absolute treasure trove for all things printed, from exquisite invitations and personalized stationery to stunning wall art and, of course, captivating party decor. Minted graciously partnered with us, providing a spectacular array of items that brought my vision to life and had me beaming from ear to ear!
Curating the Perfect Atmosphere with Minted.com
Browsing Minted’s extensive collection was a delightful challenge – there were so many adorable options, making it wonderfully difficult to choose! For anyone planning their own gender reveal, I highly recommend exploring their website, especially the dedicated Baby Shower Decorations section. You’ll discover a vast selection of themes and styles to fit any aesthetic, ensuring your party is perfectly adorned, whether you prefer whimsical, elegant, or modern designs. Their high-quality printing and unique artist-designed themes truly set them apart.
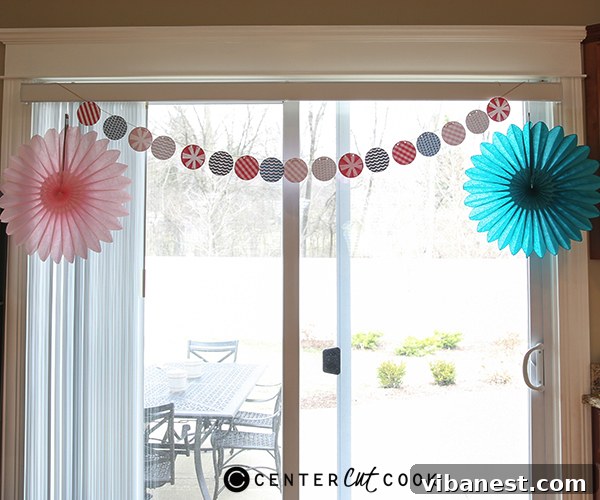
My selection from Minted primarily drew from two distinct collections, allowing us to embrace both traditional pink and blue aesthetics without revealing too much too soon. For the blue-themed elements, I chose pieces from their enchanting “Big Whale Little Whale Party Decor” section. The whimsical whale motifs were utterly charming and added a playful touch, perfect for a baby boy’s announcement. For the pink side, I gravitated towards items from the elegant Sparkle Fete Party Decor section, which offered a touch of glitter and sophistication, ideal for a potential baby girl. Among my absolute favorites were the delightful circle garlands, which I artfully draped above our doorway, instantly transforming the entrance into a festive gateway. Equally adored were the adorable cupcake topper stickers, which added a personalized flair to all our baked goodies, including the star of the show – our reveal cupcakes. These small, thoughtful details elevate simple treats into themed masterpieces.
In addition to these curated packages, I also selected a few standalone items that perfectly complemented our chosen themes. The fun pink and blue striped paper straws were an instant hit, adding a pop of color and a touch of vintage charm to our drink station. These small details collectively created a cohesive and joyful atmosphere that everyone appreciated, tying the entire decor scheme together seamlessly.
Engaging Your Guests: The Gender Guessing Game
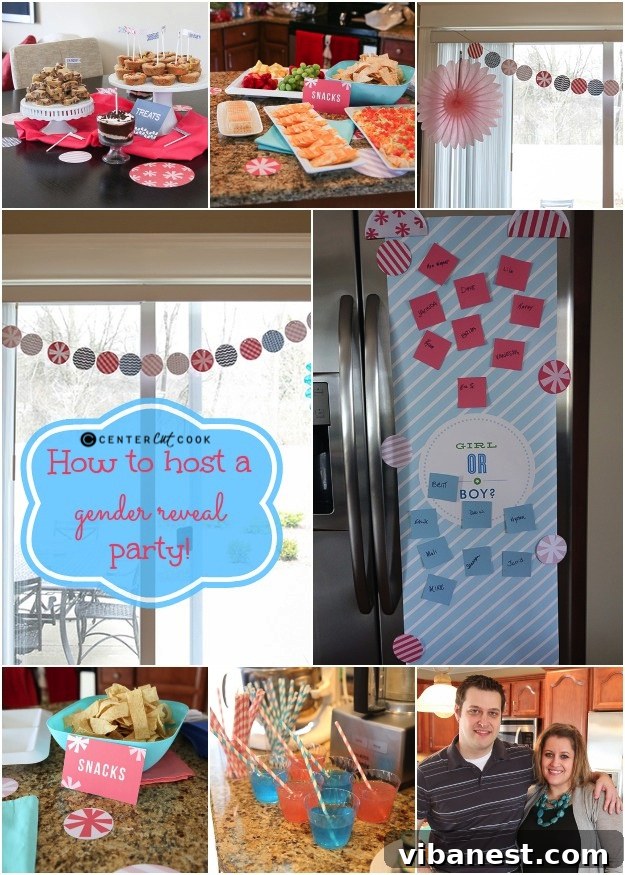
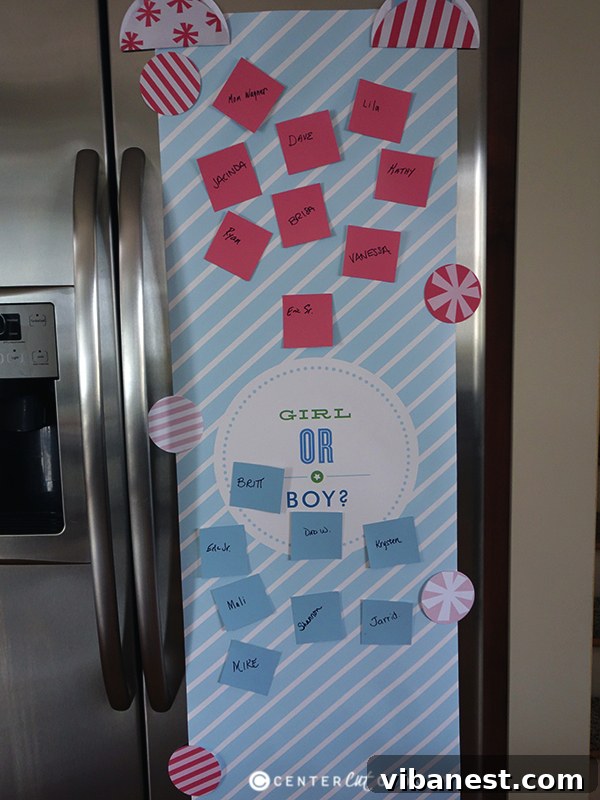
An interactive element can significantly elevate a gender reveal party, and we found a fantastic way to engage our guests right from the moment they arrived. As each friend and family member entered, we asked them to cast their vote: boy or girl? To visually track everyone’s predictions, I utilized this personalizable table runner, ingeniously hanging it on our fridge as a makeshift “guess board.” Guests then wrote their names on paint chip samples, easily sourced from Home Depot, and placed them under their chosen gender. It was a wonderfully fun and visual way to see the collective anticipation build throughout the party, sparking playful debates and adding an extra layer of excitement before the big reveal. You could also use small chalkboards, voting jars, or even custom-printed ballots for a similar effect.
Beyond the Basics: General Decor Tips
Whether you’re using curated collections or opting for a DIY approach, a few general tips can help make your gender reveal decor truly special. Consider a balanced color palette of pinks, blues, and neutrals like white, gold, or silver to create a festive yet cohesive look. Balloon arches in these colors make a stunning backdrop for photos and instantly transform any space. Tablecloths, streamers, and banners are easy and affordable ways to inject color and reinforce your theme. Small touches like personalized water bottle labels, themed centerpieces featuring baby items, or even a simple “Oh Boy/Oh Girl” sign can tie everything together beautifully. Remember, the goal is to create a festive and joyful ambiance that builds anticipation for the reveal, making every corner of your party feel celebratory. I cannot recommend Minted highly enough for their quality and variety; I’m already dreaming of their darling birth announcements for when our little one arrives!
Delightful Bites & Sips: Gender Reveal Food and Drink Ideas
When it came to the party menu, my goal was to keep things delicious yet manageable, allowing me more time to enjoy the celebration and less time fussing in the kitchen. A simple spread of crowd-pleasing appetizers and themed beverages proved to be the perfect balance for our gender reveal, ensuring there was something for everyone without overwhelming the host.
Simple Yet Impressive Appetizers
We opted for a classic combination of a fresh fruit tray and a generous plate of assorted cheeses and crackers. These are always a hit, offering light and refreshing options that cater to various tastes. To complement these, I whipped up a few homemade appetizers that are tried-and-true favorites, ensuring there was something savory and satisfying for everyone:
- Pizza Dip (get the irresistible recipe here) – A warm, cheesy, and utterly delicious crowd-pleaser.
- Taco Dip (find the delicious recipe here) – Layers of flavor that are always a hit with tortilla chips.
- Veggie Pizza (try this lighter recipe here) – A refreshing and vibrant cold appetizer.
These dishes are not only easy to prepare in advance but also incredibly flavorful, making them ideal for a relaxed party setting. Consider presentation by using colorful serving dishes, arranging food artfully, or garnishing with fresh herbs to add an extra touch of elegance to your simple spread. Other easy ideas include mini quiches, bruschetta, or a colorful caprese salad.

Themed Beverages for a Splash of Color
To keep our pink and blue theme consistent throughout the party, I focused on vibrant, color-coordinated drinks. We served refreshing raspberry lemonade for the ‘pink’ side and surprisingly, finding a suitable blue beverage was a bit more challenging than anticipated! We ultimately went with blue Gatorade, which provided the perfect pop of color. Other ideas for themed drinks include pink grapefruit juice, strawberry milk, or a simple mocktail made with grenadine for pink. For blue, consider blue Hawaiian punch, tinted lemon-lime soda with blue food coloring, or a non-alcoholic blue curaçao syrup mixed with sparkling water. Layered drinks, where you carefully pour a heavier syrup first (like grenadine) and then a lighter blue drink on top, can also create a visually stunning effect, adding to the excitement and intrigue of the theme.
Setting the Tone: Crafting Your Gender Reveal Invitations
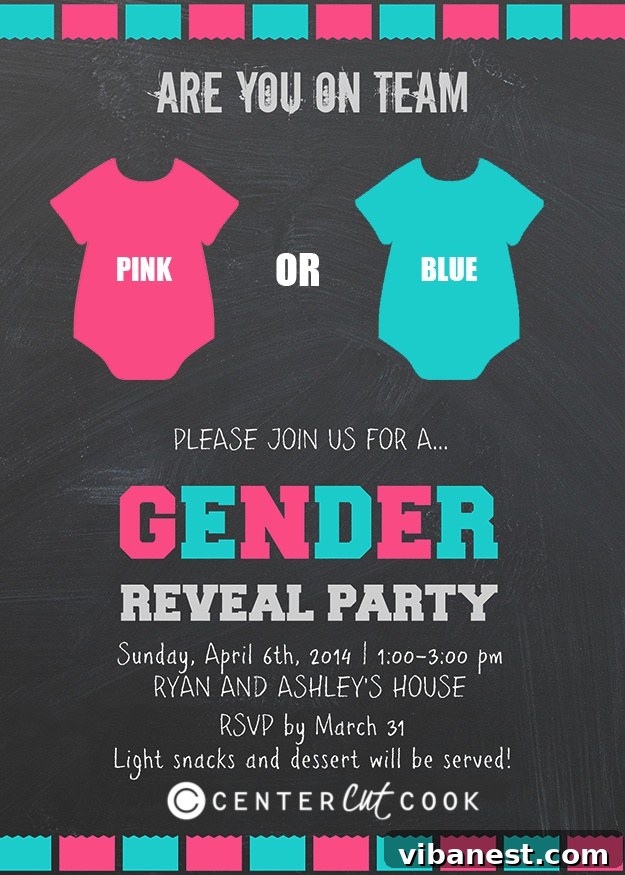
The invitation is your guests’ first glimpse into your party, setting the tone and building initial excitement. I designed our cute little invite using a combination of PicMonkey and Photoshop, leveraging their intuitive design tools to create something truly personal and adorable. When creating your invitations, consider incorporating classic gender reveal elements like whimsical question marks, elegant “bow or bowtie” motifs, or sweet phrases such as “twinkle twinkle little star, how we wonder what you are.” Essential information to include is the date, time, location, and RSVP details (including a contact person and date). Platforms like Canva or various templates available on Etsy can also be excellent resources for crafting beautiful and professional-looking invitations without needing advanced design software, offering a wide range of customizable designs to match your party’s aesthetic.
The Grand Reveal: DIY Gender Reveal Cupcakes
And now for the moment everyone has been waiting for – the gender reveal cupcakes! While ordering from a bakery is always an option, there’s something incredibly personal and satisfying about creating these special treats yourself. The process is surprisingly straightforward, and the result is a truly memorable and delicious way to announce your baby’s gender. Here’s a detailed guide on how I made ours, ensuring each bite held a sweet secret and delivered maximum excitement.
Why Choose Cupcakes for Your Big Reveal?
Cupcakes are an ideal choice for a gender reveal for several compelling reasons. They offer individual portions, making serving simple and hygienic, eliminating the need for plates and forks if guests prefer to mingle. Each guest gets their own mini surprise, adding a personal touch to the reveal. Unlike a single large cake, which requires careful cutting and timing to reveal the color, cupcakes ensure that the secret is perfectly contained until that first delightful bite. The anticipation as everyone simultaneously bites into their cupcake creates an electrifying moment of shared joy and surprise, making it an unforgettable experience for all.
Prepping Your Cupcakes: From Scratch to Box Mix
To begin, you’ll need 24 prepared cupcakes. While I always intend to bake from scratch, sometimes life (and a busy pregnancy!) calls for a shortcut. On the day I planned to make ours, I realized I was out of oil, so I happily resorted to a high-quality box mix I had in the pantry. Don’t hesitate to use a box mix if it saves you time and stress; modern mixes are fantastic and produce delicious results. Alternatively, if you have a favorite homemade cupcake recipe, feel free to use that. Consider classic vanilla or chocolate bases, which complement any frosting flavor beautifully, or experiment with unique flavors like lemon or red velvet for an extra touch.
Mastering the Buttercream: The Heart of Your Cupcakes
The frosting is where the magic truly happens! I used my tried-and-true homemade buttercream recipe (detailed below). The key to perfect buttercream is creaming your butter sufficiently until it’s light and fluffy, then gradually incorporating the sifted confectioners’ sugar. Sifting is crucial for a lump-free frosting. For a smooth, pipeable consistency, slowly add milk one tablespoon at a time, mixing thoroughly after each addition. If it seems too thick, a tiny bit more milk will help loosen it; if it becomes too thin, a spoonful of extra sifted confectioners’ sugar can quickly fix it. Once your buttercream is ready, divide it in half. Tint one half a vibrant pink and the other a lovely blue using gel food coloring for the best results – it provides intense color without altering the frosting’s consistency, unlike liquid food coloring.
The Secret’s Inside: Filling Your Gender Reveal Cupcakes
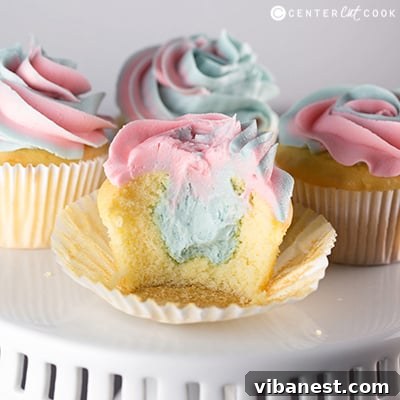
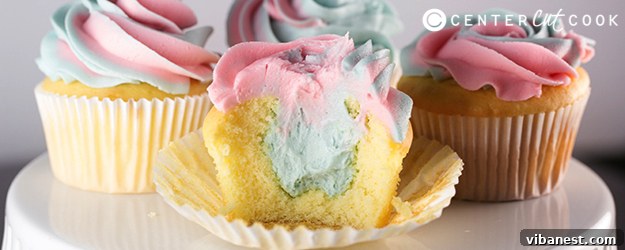
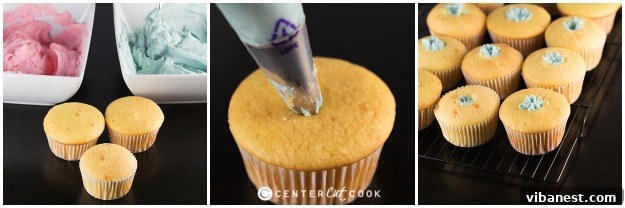
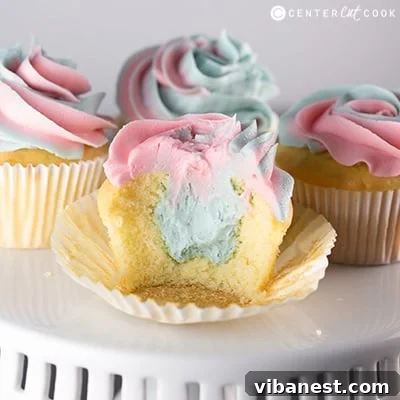
This step is crucial for the “reveal” aspect. Take about 1 and a half cups of the prepared buttercream and tint it either blue or pink with gel food coloring, depending on your baby’s gender. For us, since we were having a boy, I colored this portion blue. Fit a disposable decorating bag with a Wilton 1M tip. Gently press the tip about half an inch into the center of each cupcake, pushing it down slightly to create a cavity. Squeeze a generous amount of the colored frosting into the core of the cupcake until it feels adequately filled, then carefully pull the tip out. Repeat this for all 24 cupcakes, ensuring each one holds its secret gender clue within. For an extra surprise, you could also add a few sprinkles or a small piece of candy along with the frosting inside the cupcake.
Creating the Iconic Two-Tone Swirl: A Step-by-Step Guide
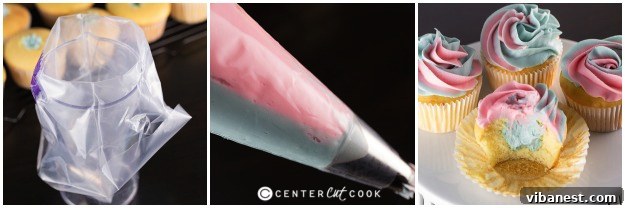
Now for the visually stunning two-tone frosting swirl on top! Get another clean disposable frosting bag, again fitted with the Wilton 1M tip. For easier handling and to prevent a mess, place the bag inside a large plastic cup to hold it open and upright. This is the “tricky” part that creates the beautiful pink and blue marbled effect. Carefully fill half of the piping bag with the pink frosting and the other half with the blue frosting, side by side. Using a small spatula or butter knife can help ensure an even split and prevent the colors from mixing prematurely. Once the bag is filled, gently squeeze a small amount of frosting out over a bowl or paper towel before you start frosting the cupcakes. This crucial “test squeeze” ensures that both blue and pink frosting are coming out simultaneously, creating that perfect swirled look from the very first cupcake. It might take a couple of tries to get the hang of filling the bag perfectly, but it’s definitely achievable with a little patience!
To frost each cupcake, hold the 1M tip approximately half an inch above the center of the cupcake at a 90-degree angle. Begin by applying gentle, even pressure to squeeze out frosting, forming a small star in the middle. Without releasing pressure or lifting the tip entirely, slightly raise the tip and start piping the frosting in a continuous clockwise spiral, working your way outwards from the center. Continue this circular motion until the entire top surface of the cupcake is covered in a beautiful, rising swirl of two-toned buttercream. Once your spiral is complete, release the pressure and gently pull the tip away to finish the frosting swirl cleanly. Consistency in pressure is key for even swirls.
Expert Tips for Flawless Cupcake Decoration
If you’re new to cupcake decorating, don’t be intimidated! It’s a skill that’s surprisingly easy to pick up with a little practice. You might find this Wilton Cupcake Decorating kit incredibly helpful. It often includes the essential 1M tip and provides clear instructions and visuals for various decorating techniques. A little practice on a piece of parchment paper or an upside-down cup beforehand can work wonders for building confidence before you tackle your actual cupcakes. Remember, imperfections add character and a homemade charm, and the effort you put in makes these cupcakes even more special for your gender reveal. The joy of the reveal will far outweigh any tiny frosting mishap!
That’s it! Crafting your own gender reveal cupcakes is a delightful and rewarding process, offering a truly unique and delicious way to share your exciting news with family and friends. While the two-tone frosting might require a bit of careful attention during the bag-filling stage, it’s absolutely manageable with a small spatula and a steady hand. The sheer joy on everyone’s faces as they discover the sweet secret inside is worth every moment of effort, creating a memorable culinary centerpiece for your celebration.
Should you have any questions about our gender reveal party or the cupcake creation process, please don’t hesitate to ask in the comments below! We’re thrilled to share our experience and help you plan your own unforgettable celebration.
The Joyful Conclusion: Welcoming Baby Wagner
And for our incredible news: Baby Boy Wagner will be joining our family this August! We are overflowing with joy and gratitude, eagerly anticipating his arrival. This gender reveal party was not just a celebration; it was a beacon of hope and happiness during a challenging time, reminding us of the incredible blessings life brings. It allowed us to focus on the future and share our excitement with those who mean the most to us. We can’t wait to welcome our little man and embark on this new chapter as a family!
Disclaimer: Minted.com generously provided the decorations for this party. Rest assured, all opinions expressed are entirely my own and reflect my genuine experience with their products.
DECORATING INGREDIENTS
- 24 cupcakes of your choice (store-bought or homemade)
- Wilton 1M piping tip
- Disposable decorating bags
- Homemade buttercream frosting (recipe below)
- Blue and Pink gel food coloring
FROSTING INGREDIENTS (Yields enough for 24 cupcakes with generous piping)
- 4 sticks (1 lb) unsalted butter, softened to room temperature
- 1/4 teaspoon fine sea salt
- 8 cups confectioners sugar, sifted (approximately 2 lbs)
- 4 teaspoons pure vanilla extract
- 4-5 tablespoons whole milk, or as needed for consistency
DIRECTIONS
- Prepare Buttercream: In a large mixing bowl, using an electric mixer fitted with the paddle attachment, cream the softened butter on medium speed until it is very light and fluffy (about 2-3 minutes). Add in the salt and vanilla extract and mix until just combined.
- Add Sugar: Gradually add the sifted confectioners sugar, one cup at a time, mixing on low speed until fully incorporated after each addition. Scrape down the sides of the bowl as needed to ensure everything is mixed. Continue until all 8 cups of sugar have been added and the frosting is thick.
- Adjust Consistency: Slowly add the milk, one tablespoon at a time, mixing on medium speed until you achieve your desired smooth, pipeable consistency. If the frosting seems too thick, add a little more milk. If it becomes too thin, incorporate a bit more sifted confectioners sugar until corrected.
- Fill Cupcake Centers (The Secret Reveal): Take about 1 ½ cups of the prepared buttercream and tint it either blue or pink with gel food coloring, depending on the gender you are revealing. Fit a disposable decorating bag with a Wilton 1M tip. Press the tip approximately ½ inch into the center of each cupcake and squeeze to fill the core with frosting (about 1-2 teaspoons per cupcake). Carefully pull the tip out. Repeat for all 24 cupcakes.
- Tint Remaining Frosting: Divide the remaining buttercream evenly between two separate bowls. Tint one bowl a vibrant blue and the other a lovely pink using gel food coloring. (Approximately 10-12 drops of gel food coloring per bowl should achieve a vibrant hue, but adjust to your preference for color intensity).
- Prepare Two-Tone Piping Bag: Get a new disposable decorating bag and fit it with a clean Wilton 1M tip. Place the bag inside a large plastic cup to provide support and keep it open. Carefully fill one half of the bag with the blue frosting and the other half with the pink frosting, ensuring the colors are side-by-side without mixing too much. Using a small spatula can help with this step. Before frosting the cupcakes, squeeze a small amount of frosting out onto a paper towel or plate to ensure both colors are flowing out simultaneously and evenly.
- Pipe Two-Tone Swirls: Hold the 1M tip about ½ inch above the center of a cupcake at a 90-degree angle. Apply gentle, steady pressure to create a small star in the center. Without releasing pressure, slightly lift the tip and begin piping a continuous spiral in a clockwise motion, working outwards and upwards until the entire top of the cupcake is covered in a beautiful two-tone swirl. Release pressure to finish the swirl cleanly. Repeat for all cupcakes.
- Enjoy & Store: You may have some leftover frosting, which is ideal – it’s always better to have too much than not enough! Store any remaining frosting in an airtight container in the refrigerator for up to a week, or freeze for longer storage. Allow to come to room temperature and re-whip before using.
Recipe adapted from
CenterCutCook