Introduction
Tile flooring is a sought-after choice for various areas in the home, including kitchens, bathrooms, and entryways. Its combination of aesthetic appeal and practicality makes it ideal for high-traffic areas that require easy maintenance. If you’re a DIY enthusiast, installing tile floors can be a rewarding weekend project that enhances your home's beauty and functionality.
Tools and Materials Needed
Before you start your tile installation, gather all necessary tools and materials. Having everything on hand will streamline the process and help you avoid delays. Here’s a list of essential items:
- Chisel: For removing old tiles and preparing the floor.
- Floor scraper: To clear debris and smooth surfaces.
- Measuring tape: For accurate room dimensions.
- Level: To ensure a flat surface.
- Chalk line: For marking straight lines on the floor.
- Bucket: For mixing mortar.
- Paddle mixer: To mix thinset mortar effectively.
- Tile cutter: For cutting tiles to fit the room’s dimensions.
- Rubber mallet: For gently tapping tiles into place.
- Grout and grout sealer: To fill joints between tiles and protect them.
Project Overview
This project typically requires 5 to 10 hours of active work, with a total completion time of 1 to 2 days, depending on the complexity and size of the area. The skill level is intermediate, making this a suitable challenge for those with some DIY experience. The estimated cost for materials ranges from $500 to $1,000.
Preparation Steps
Prior to laying new tile, ensure that the existing flooring is adequately prepared. This involves removing any old tiles, baseboards, and obstacles. Use a chisel and floor scraper to clear the area of any debris or loose materials that could hinder the installation process. It’s critical to have a clean and stable surface to work on.
Make sure to check the subfloor for any damage or instability, as this could affect the longevity of your new tile floor. If your subfloor is uneven, consider leveling it out before proceeding with the installation.
Measuring the Space
Accurate measurements are crucial for a successful tile installation. Measure the length and width of the room to calculate the total square footage. Depending on the size of the tiles you plan to use, add an extra 10 to 15 percent to your total to account for cuts and waste. This will help ensure you have enough tiles to complete the project.
Creating a Tile Layout
Before laying tiles, outline a layout to ensure a balanced design. Begin by marking the center points of opposite walls and snapping a chalk line to create a reference grid. This will help you visualize where each tile will go and maintain symmetry throughout the installation. Dry fit the tiles in this layout to check for any adjustments needed.
Preparing the Mortar
Mix the thinset mortar according to the manufacturer's instructions. Use a paddle mixer for a consistent blend and let it sit for a few minutes. If you’re working with a backer board, lightly dampen it with a spray bottle before applying the mortar with a trowel. This step is critical to ensure proper adhesion of the tiles.
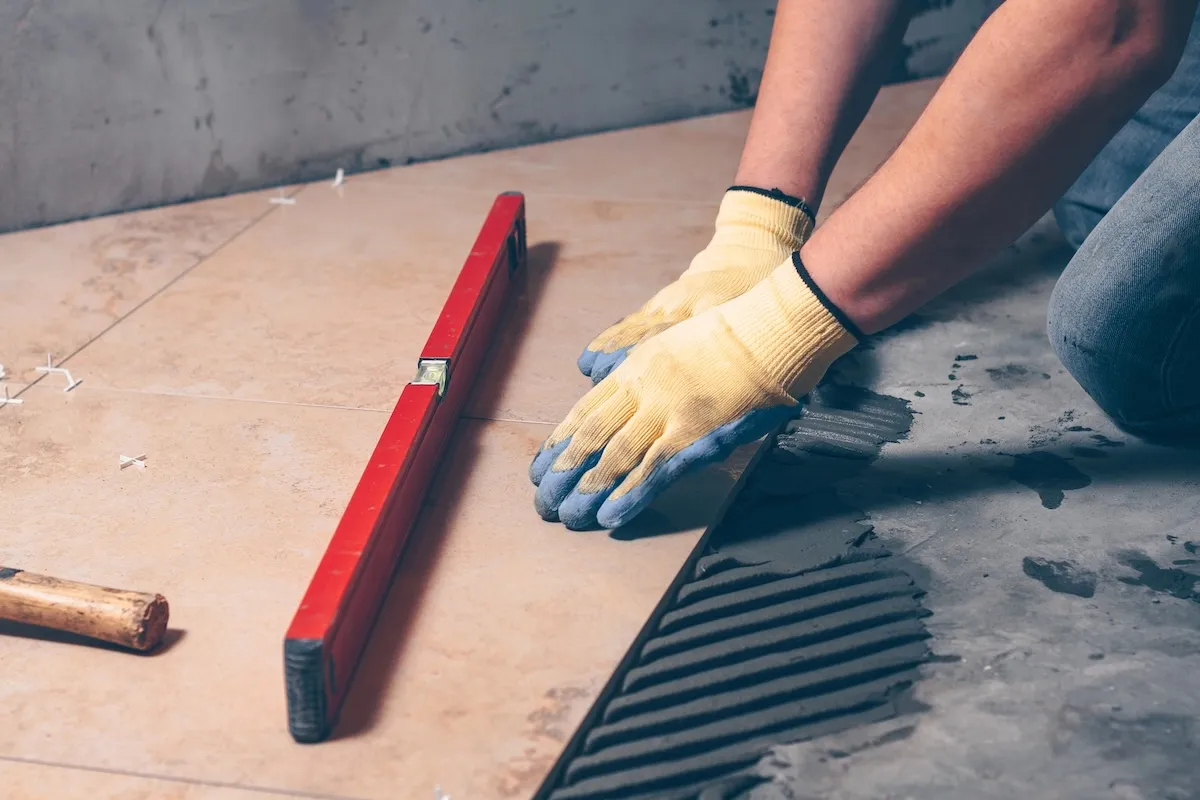
Laying the Tiles
Start laying the tiles from the center of the room, following your prepared layout. Place the first tile and use spacers to ensure even gaps between tiles. As you progress, keep checking alignment with a level and make adjustments as necessary. Take your time to avoid rushing, as this can lead to misaligned tiles.
Cleaning and Leveling
As you work, frequently wipe off excess mortar from the tiles with a damp sponge. This keeps your tiles clean and prevents mortar from drying on the surface. Periodically check that the tiles are level by placing a board across them and tapping gently with a rubber mallet if needed.
Cutting Tiles
In most cases, you will need to cut tiles to fit around edges and corners. Measure carefully and mark your tiles before cutting. A tile cutter can help achieve straight cuts, while tile nippers are useful for more intricate shapes. For tougher materials like porcelain, consider using a wet saw to minimize the risk of chipping.
Grouting the Tiles
Once the tiles are set and the mortar has cured for at least 24 hours, it’s time to grout. Remove the spacers and use a rubber float to press grout into the joints. Work in sections and clean excess grout off the tiles with a sponge. Allow the grout to set for the recommended time before cleaning the surface again.
Sealing the Grout
After the grout has cured for a few days, apply a grout sealer to protect against moisture and staining. This will help maintain the appearance and durability of your new tile floor. Follow the sealer's instructions for the best results.
Final Touches
Once the grout is sealed and set, reinstall any baseboards, molding, or thresholds you removed at the beginning of the project. If the old materials are damaged, consider replacing them for a refreshed look.
Conclusion
Installing tile floors can be a fulfilling DIY project that enhances your home’s aesthetic and value. While it requires careful planning and execution, the end result can be both beautiful and functional. If at any point you feel uncertain about the process, consulting a professional can ensure a high-quality finish.